How Do You Manage Vendors in QuickBooks?
In these days of supply chain issues, you need to keep track of your vendors. QuickBooks has this covered.
If you buy and resell products, or if you need to purchase materials to create your own items, good management of your company’s vendor records is critical. Maintaining a physical card file is way too inflexible. You can’t find or edit individual records quickly or easily. They get lost, or they’re illegible because you’ve updated the cards too many times.
When you create a transaction like a purchase order or you write a check, you have to look back and forth between your card and the form, and it’s easy to make transposition errors. And you can’t generate reports – not even an alphabetized list.
QuickBooks solves all of these problems. It includes blank vendor records that you can fill in and save. You can find the ones you’re looking for in a couple of seconds, and modifying them is a simple process. If you need to use vendor data elsewhere in the software, you only have to select the correct entry from a list. And vendor reports are plentiful. Here’s how it works.
The Vendor Information Screen
QuickBooks displays all of your vendor records and related tools on one page. To get to it, click Vendors in your toolbar to open the Vendor Information screen. There’s a list of vendors and transactions to the left and a small horizontal toolbar at the top containing action icons. But most of the page is taken up by your vendor records, displayed one at a time. To create a new one, click New Vendor in the upper left corner. A window like this appears:
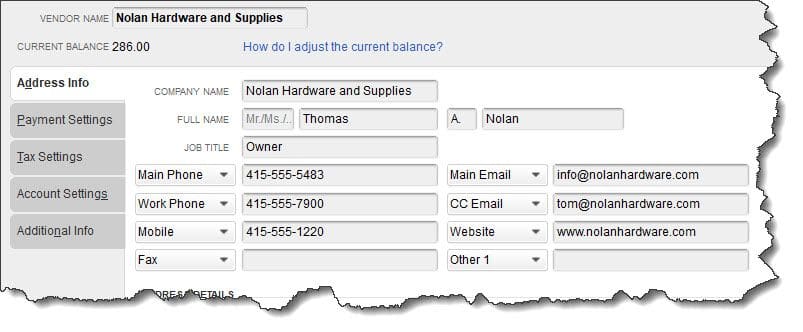
Partial view of a QuickBooks vendor record
Fill in the blanks to complete your vendor’s contact information. Below that section, you’ll enter a physical address. Click Payment Settings in the series of tabs in the upper left. Here, you can enter an account number (if applicable) and select payment terms (like Net 30). You can also specify a credit limit and indicate how the vendor’s name should appear on checks. Click Tax Settings to enter a Vendor Tax ID and mark them as eligible for an IRS Form 1099 (using information from the vendor-provided W-9).
Clicking the Account Settings tab opens a window that may be confusing to you. If you’re entering a phone bill, for example, you’ll need to assign the correct expense account to it, which in this case would be Utilities: Telephone. That account will be automatically selected when you create a transaction for that vendor. There’s space for two alternate accounts here, too, if you think you’d ever have occasion to use a different one.
Warning: You must be accurate when assigning default accounts anywhere in QuickBooks, or you may run into problems with reports and taxes. We can go over this concept with you.
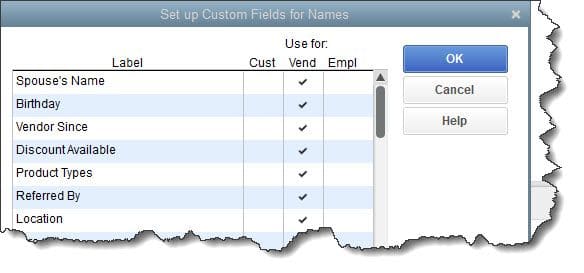
Click the final tab, labeled Additional Info, and you’ll have two options. You can specify a Vendor Type, like Utilities or Subcontractors (or create your own) and you can define Custom Fields that will appear on your customer, vendor, and employee records. You can assign up to 18 total, no more than seven to vendors.
Partial view of a QuickBooks vendor record
Fill in the blanks to complete your vendor’s contact information. Below that section, you’ll enter a physical address. Click Payment Settings in the series of tabs in the upper left. Here, you can enter an account number (if applicable) and select payment terms (like Net 30). You can also specify a credit limit and indicate how the vendor’s name should appear on checks. Click Tax Settings to enter a Vendor Tax ID and mark them as eligible for an IRS Form 1099 (using information from the vendor-provided W-9).
Clicking the Account Settings tab opens a window that may be confusing to you. If you’re entering a phone bill, for example, you’ll need to assign the correct expense account to it, which in this case would be Utilities: Telephone. That account will be automatically selected when you create a transaction for that vendor. There’s space for two alternate accounts here, too, if you think you’d ever have occasion to use a different one.
Warning: You must be accurate when assigning default accounts anywhere in QuickBooks, or you may run into problems with reports and taxes. We can go over this concept with you.
Click the final tab, labeled Additional Info, and you’ll have two options. You can specify a Vendor Type, like Utilities or Subcontractors (or create your own) and you can define Custom Fields that will appear on your customer, vendor, and employee records. You can assign up to 18 total, no more than seven to vendors.