Why You Should Back Up Your QuickBooks File, and How To Do It
Whether you’re just backing up your company file or you’re moving to a new computer, you should know how QuickBooks accommodates these processes.
It shouldn’t take the thought of a natural disaster to make you think about always having a current backup of your QuickBooks information. Files get corrupted. Computers fail and become inaccessible. Hackers can get in and compromise your valuable company information.
And once you lose your customer and vendor data and all of your historical transactions, your business is gone. You might be able to reconstruct parts of it if you were storing some information on paper, but how long would that take? Meanwhile, your customers and vendors might give up and turn elsewhere.
Backing up your QuickBooks company file is not just a good idea. It could save your company someday. You’ll also need to do it when you need to move it to a new computer. Here’s how it works.
Before You Start
You’ll need to decide two things before you begin the backup process. Do you want to:
- Back up to a local storage device, like a CD or USB drive, or to the cloud?
- Set your backups to occur automatically or launch them manually?
Both options are available within QuickBooks Desktop, though online storage will occur additional fees.
Note: Instructions and screenshots were created using QuickBooks Premier 2021. If your version varies, please contact us.
Setting Up Local Backups
We’ll start by describing how you create a backup copy you can hold in your hand (we recommend you store this off-site). First, make sure your copy of QuickBooks is up to date. If you’re using automatic updates, this shouldn’t be a problem, though you might want to check to make sure a new update hasn’t been released. Open the Help menu and select Update QuickBooks Desktop, then follow the instructions. You should definitely do this if you’re updating manually.
Warning: You must be in single-user mode to create backups. Open the File menu and click Switch to Single-user Mode if you’re not there already.
Open the File menu and click Back Up Company | Create Local Backup. In the window that open, click the button in front of Local backup, then click Options. This window will open:
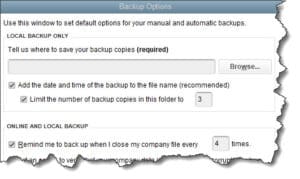
You’ll need to specify your options before creating your first backup in QuickBooks.
Browse to find the desired location for your backup (this should not be on the same drive where QuickBooks is stored, but rather a removable storage device), then complete the rest of the fields in this window. Be sure to choose Complete verification at the bottom of the window to ensure that your QuickBooks company field is not corrupt. Click OK. The window will close and return you to the Create backup window. Then click Next.
The window that opens ask when you want to save your backup. You can:
- Save it now.
- Save it now and schedule future backups.
- Only schedule future backups.
Select the second option and click Next. You have two choices. You can have QuickBooks save a backup every X times you close your company file, or you can create a schedule. To do the latter, click New. Give your backup a Description and Browse to its desired location. Then tell QuickBooks when the backup should run. You can select a specific time as well as multiple days of the week.
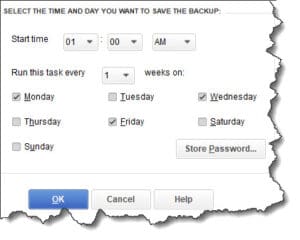
Tell QuickBooks when you want it to automatically save backups.
Once your schedule is set, click Store Password. Enter your Windows username and password so your backups can be launched when you’re not at your computer. Click OK, then OK again, then Finish. QuickBooks will then verify the integrity of your data and create your first backup. You can always go back into the Create Backup screen to Edit or Remove a schedule.
Tip: When prompted in the Save Backup Copy window, modify the name of your backup slightly so it doesn’t overwrite your original file. Write it down and save it.
Restoring a QuickBooks Company File
Before you start, move your backup file from your external storage device or cloud service to your local hard drive.
Your backup file will have a .qbb extension. QuickBooks will convert this to a .qbw file during the restoration process. Open the File menu and click Open or Restore Company, then Restore a backup company in the window that opens. Click Next and select Local backup, then click Next again.
Click the down arrow next to Look in to locate your .qbb backup file. Click it to highlight it, then click Open. Click Next in the window that opens. The Save in field in the window that opens should be pointing at Company Files, which is where your file should go. Click Save. If you get a message warning you that your file is going to overwrite an existing file, back up and change the name of your company file or backup. QuickBooks will then do the restoration and open to your backup company file.
Tip: You can create a smaller file that only contains your accounting data that you want to share or move. This is called a portable company file, and it lacks some of the information included in a full backup, like templates, logos, and images. Ask us how to do this.
Online Backup for QuickBooks
If you’d rather store your QuickBooks file in the cloud, you can subscribe to Intuit Data Protect. You have access to this from QuickBooks, but there’s a fee involved ($9.95 per month or $99.95 per year). You can store up to 100GB of data using this service. Backups and encrypted and automated. If you decide to go this route, we can help you get going with it.
Risky Business
You need to be extremely careful when you’re working with QuickBooks’ backup and restore functions. You need to be sure which type of backup you need, and you certainly must avoid overwriting data that you’ll need. We’d be happy to walk you through this process the first time until you understand it well. Contact us to schedule some time.