How Do You Move Transactions from Your Bank into QuickBooks Online?
QuickBooks Online makes this an easy trip but be sure you know how the site handles them once you’ve moved them.
Manual transaction entry doesn’t make sense anymore – not when QuickBooks Online makes the process of importing them from your bank so easy. If you enter them on your own, you risk data transposition errors, which can create inaccuracies in your customer billing, reports, and income taxes. Plus, it takes an inordinate amount of time that you could use in running other areas of your business.
If you’re still using a manual method, we suggest you consider setting up connections to your online banks. Once your transactions are delivered to QuickBooks Online, the site provides tools that allow you to view them and make sure they’re complete before you store them. Whenever you need to see them, you’ll be able to find them easily.
Here are step-by-step instructions to how this all works.
Making a Connection
In order to do this, you’ll of course need to have set up a username and password for your online bank accounts if you haven’t done so already. In QuickBooks Online, click Bookkeeping in the navigation toolbar. It should open to Transactions | Bank transactions. Click Link account over to the right.
A page opens with suggested financial institutions. If yours isn’t there, enter it in the search field at the top. If there are multiple options, be sure to select the correct one and click it.
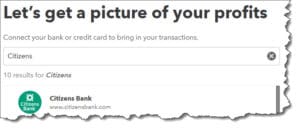
If your bank isn’t listed on the page of options, enter its name, and then click on the correct one if there’s more than one entry.
Click Continue and go through any of the security steps your financial institution may have. You’ll get to a page that says, Which accounts do you want to connect?, with a drop-down list displaying options from your Chart of Accounts. Select the type of account you’re creating (checking, credit card, etc.) and continue to follow the onscreen instructions until your connection is complete and QuickBooks Online has downloaded your transactions.
WARNING: It’s important that you set up your linked accounts correctly since you’re dealing with the Chart of Accounts. If any step is confusing, we can schedule a session to go over online account connections with you.
Dealing with Transactions
Once you’ve connected to all your online accounts, you’ll see that they appear on the Bank transactions page, displayed in small boxes containing their balances and the number of transactions they contain (there might be quite a few when you first download). You can also see how recently each account was updated (click Update anytime you want to refresh an account).
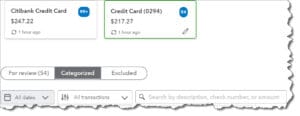
Once you’ve connected to an online bank account, you can see how many transactions were downloaded and what its balance is.
Click one, and its register will appear below. Above that, you’ll see three labeled bars:
- For review. QuickBooks Online puts all downloaded transactions in this list.
- Categorized. Your transactions will move to this list after you’ve assigned categories to them.
- Excluded. If you happen to run into duplicate transactions, you can move them here.
Below that, you’ll see that you can filter your transactions by date, by type, or by description, check number, or amount.
WARNING: As you continue to work with accounts, you may occasionally find that a connection has been unlinked. When that happens, just repeat the connection process again.
Working with Individual Transactions
You’ll want to set some time aside the first time you download transactions so you can look at each one and add or edit its content. Click one to open its detail box, as shown below. The top line defaults to Categorize. First, select the correct Vendor/Customer (or + Add new), then check the Category and change it from the drop-down menu if it’s incorrect.
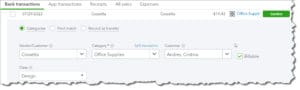
You can add or edit a lot of details for your individual transactions.
There’s one more field here that’s very important. If you’re purchased something on behalf of a customer, be sure to select the correct one from the drop-down list under the Customer field and click the Billable box. QuickBooks Online will make this transaction information available to you the next time you invoice the customer. Other fields not shown in the above image are optional, like Tags, Memo, and Adad attachment. When your transaction is complete, click Confirm to move it to the Categorized list.
There are two other options in these individual transaction boxes besides Categorize: Find match (match downloaded payments to invoices, for example) and Record as transfer (move money from one account to another). These are advanced topics that aren’t necessarily intuitive, so we can schedule a session to go over them if you anticipate needing to use them.
The mechanics of connecting to your banks in QuickBooks Online aren’t complicated, but you may run into problems in moving transactions along when they’re first downloaded. Let us know if we can help here. It’s much easier to get it right from the start than to try to untangle transactions that weren’t processed properly.