Creating Items and Jobs in QuickBooks, Part 2
Now that you’ve created some Items and Jobs in QuickBooks, what can you do with them?
Last month, we talked about creating Item and Job records in QuickBooks. You can think of a Job as a project your company is doing for a customer, like a marketing campaign or a series of landscaping tasks. Once you set one up, you can assign all related transactions to it and eventually gauge its profitability.
We went over the steps required for managing Item and Job information. These actions allow you to:
- Create Product and Service Records (Lists | Item List | Item | New) that make up each Job.
- Create the Jobs themselves (Customers | Customer Center | New Customer & Job | New Customer or Add Job).
This month, we’re going to explain how you can use Jobs in QuickBooks to keep track of all the income and expenses attached to each one. You can assign expenses like products you purchase, billable time, mileage, overhead (ask us how you can calculate this), freight charges, postage, etc., to specific Jobs. And of course, you’ll want to assign payments received to Jobs.
Creating Billable Time Entries
If you are using QuickBooks Payroll and you’re going to be tracking hours for an employee so that he or she will be paid for their time, make sure the worker is set up for this first. Go to Employees | Employee Center and double-click the name of the employee. Click Payroll Info and check the box in front of Use time data to create paychecks, then click OK to close the window.
When you want to enter hours worked on a specific Job, open the Employees menu again. Click Enter Time | Time| Enter Single Activity. Complete the fields in this window as pictured below.
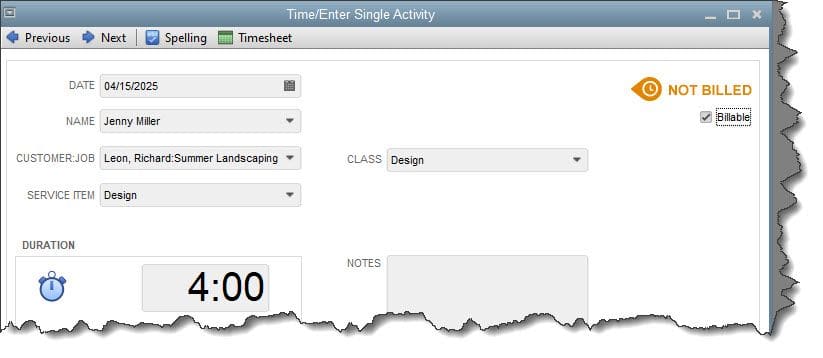
You can create a record of billable time that will be used to both pay the employee and invoice the customer in this window.
If you don’t see the Enter Time option in the Employees menu, you haven’t turned on time-tracking in QuickBooks. Go to Edit | Preferences | Time & Expenses and click Company Preferences. Click the Yes button under Do you track time? There are other options in this window. You can mark all time entries as billable, for example, and set a Default Markup Percentage. If you want to move time and expense entries into customer invoices automatically, check the box in front of Create invoices from a list of time and expenses. When you’re done, click OK.
Questions on this window? Just ask us.
Assigning Jobs to Other Transactions
Any transaction in QuickBooks that can be assigned to a customer can be assigned to a job. In all cases, be sure to assign the Job itself, not just the customer. And where appropriate, there will always be a Billable column or checkbox. Here are some examples of the transactions you can use:
Checks. This one’s easy. When you write a check, simply assign it to a CUSTOMER:JOB, whether it’s for Expenses or Items.
Sales Receipts. Say you’re doing a one-off task like tree and shrub trimming (as part of a larger Job) and the customer wants to pay you on the spot. In this case, you’d create a Sales Receipt. Go to Customers | Enter Sales Receipts. Select the CUSTOMER:JOB and fill out the rest of the fields, then save the transaction.
Bills. If you’ve ordered items to use for a specific Job and enter/pay the bill in QuickBooks, be sure to attribute it to the CUSTOMER:JOB.
Credit Card Charges. If you put an expense for a Job on a credit card, be sure to select the CUSTOMER:JOB when you enter it in QuickBooks.
Invoices. It’s likely that you’re going to invoice customers for multiple transactions that you’ve assigned to a Job – that’s the reason you’re setting it up as a Job in the first place. There are at least four ways to do this.
- Start an invoice at the beginning of the Job and keep adding products and services and expenses to it until you’re ready to bill the customer. This is probably the least elegant way to do it, since you’ll have to keep remembering the invoice number, for one thing.
- Enter your billable items as individual entries as you go along. When you’re ready to bill the customer, open an invoice form and select the CUSTOMER | JOB. This window will open:
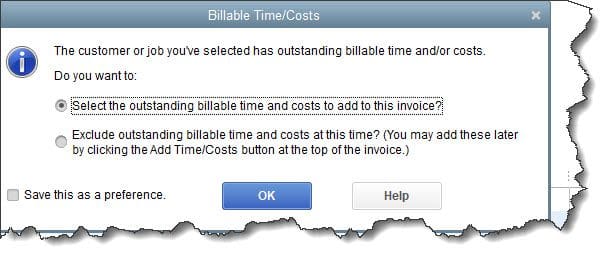
When you create an invoice for a customer who has outstanding billable time and expenses, QuickBooks will display this window.
- Open the Customers menu and click Invoice for Time & Expenses. QuickBooks will display a list of Time, Expenses, Mileage, and Items. You select the date range and template type, and the software will create an invoice for the transactions you check.
- Use Progress Invoicing. Enter products and services on an estimate, and you’ll be able to invoice them in batches. We can show you how to do this.
Of course, you’ll eventually want to know how profitable all your Jobs are so you can adjust as needed. QuickBooks can help you determine this, and we’d be happy to show you how. Let us know if you want to schedule a session to talk about this – or about any other element of QuickBooks.